Top Tips
No heating checklist
No heating checklist
If your boiler is not working as you’d expect there a few simple checks can be made before you call your engineer. You can always try the following but never exceed your own ability. If you are unsure of what should happen then make sure do not attempt the action because you could simply make your "problem" worse:
- Firstly ensure that the boiler is switched on
- Make sure your thermostat/s is/are above room temperature so the heating system has "demand".
- Check your oil level in the oil tank. Do not immediately trust the sight tube as it should be switched off and so shows how much oil you had when it was last checked. Many tubes dirty and difficult to read at low levels. If in any doubt physically dip the tank with a garden cane to check that the oil level is above the take off point.
- Check the feed pipes for oil leaks that may prevent oil getting from the tank to the boiler.
- Open the bleed nipple inside the boiler and check that oil runs out of it. If no oil runs through you may have an air lock which requires bleeding out. Always retighten the bleed nipple and clean any oil released before attempting to start up
- If the boiler has "locked out", re-set the lock out button on the boiler and try to fire the appliance again. Do not do this too often, as abuse of this button could further damage your appliance.
- Can you see if the flame has come on. A sound like burning could merely be the system pump priming itself and subsequently failing to fire. If no flame is seen by the flame sensor, the problem probably lies with the ignition system, or the flame sensor itself. If a flame appears and then dies soon after the problem probably lies with the oil feed, e.g. a broken/failing fuel pump.
- If the boiler appears to be completely dead, check for either a blown or loose fuse.
If you have tried all or some of the above and the boiler still fails to fire call your normal engineer. If you do manage to get your system going then we would still recommend that you ask your engineer to attend to professionally identify and rectify the cause of the failure.

‘Boiler Lockout’ What is it and why does it occur?
‘Boiler Lockout’ What is it and why does it occur?
When a boiler recognises a fault, most commonly through its flame sensor, it has a safety mechanism to automatically lock-down to prevent any further damage. This safeguard is referred to as lockout in oil fired boilers. As well as recognising a problem, this safeguard is designed to prevent any additional problems, and one part of the lockout is the interruption of your oil supply. Therefore if your oil fired boiler is in lockout then it will need to be reset, before it will operate again.
If you you’re unsure if your boiler is in lockout mode, check for:
An error code on the digital boiler display or boiler control panel.
A flashing red or green light, or an illuminated orange light.
The causes of an oil boiler lockout vary. Older boilers can be more prone to boiler lockout due to general wear and tear and neglected boilers can lockout because they have not been adequately serviced or maintained . Having your boiler serviced regularly can increase reliability and performance.
Another cause could be a blockage or restriction in the system that disrupts the oil feed pressure. A blocked filter on your tank, or a failing fuel pump can reduce the required fuel pressure for efficient safe atomisation and burning. Sometimes you may have simply run out of oil!
You can take your own steps to restart a boiler, if you have adequate oil in your tank, and many boiler manuals list these. But remember: Do not exceed your own ability. A persistent problem will probably require a professional solution.

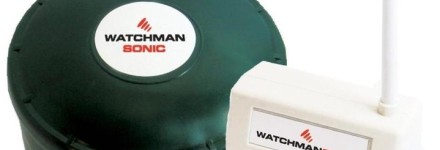
What is a Watchman?
A Watchman is an automated oil monitoring device which can be fitted to your home heating oil tank and sends a radio signal to a digital readout in your house. Watchman's tend to have replaced sight tubes on most domestic heating oil tanks over the last few years. It allows you to easily monitor the oil levels in your tank and prevent run outs.
Once the receiver detects a low battery a warning message is displayed on the unit in the home. It shows the oil level in the tank plus a constantly flashing warning triangle.
The lithium battery fitted to your Watchman will have a long service life, but it will eventually become exhausted and will need replacing.
The battery model required is: VARTA CR2430, and they are available locally from good photographic shops or chemists or can be purchased online.
9 Steps to replacing the battery:
- Switch off your Watchman display in the house
- Remove transmitter from tank
- Take transmitter indoors, into a clean dry environment
- Using a cross point screwdriver, undo the four screws, located under the main body of transmitter
- Remove the top cover, Flip out battery, Clip in new battery, Re-fit cover
- Evenly tighten all four screws - do not over tighten
- Replace transmitter on the tank
- Switch on your Watchman display in the house
- Wait 5 minutes for the oil level to refresh
Other possible error messages:
F = Full
Red Light Flashing with no level = No Signal
Red Flashing Light = Tank is low on fuel
Fluid Level Low & “BAT LOW” = New power tube needed
C = Connection fault replacement needed
Further information can be found here. Watchman Ultrasonic Installation Instructions


